


Stopping is hard.
Think about it. Have you ever tried to stop smoking, stop eating chocolate, stop watching Netflix, stop speeding, or stop drinking coffee?
It's just not easy is it?!?
I think one of the biggest mistakes we make when we are making transitions with children is that we forget what it is like to be 2, 3, or even 8 years old!
We forget how hard it is to stop doing something you love and transition to something else, possibly even something you really don't like doing like going to bed.
Not only do we forget how hard it is to stop, we also forget to prepare children for the transition and then help them get to the next activity successfully.
Last week, in the first post in this series, I shared the M.A.P. technique that can help you and your child think through these steps and be more intentional about making transitions successful. Click this link to read the full post and learn what the M.A.P. technique is all about.
The M.A.P. technique helps us focus our attention as well as the attention of our children on what we WANT them TO DO rather than what we want them to STOP doing.
Recently, I was in a classroom coaching a preschool teacher and she said something that made a huge difference for her children. Just a simple shift in her language and focus helped the whole class shift too.
Instead of turning off the lights at clean-up time and telling the children they had 5 more minutes before they had to clean-up she shifted it to, "You have 5 more minutes to play." She said this was a game changer for her little ones!
Once you've shifted your focus on what you get to do rather than what you have to stop doing then it's time to take it to the next level!
The A in the M.A.P. technique stands for add visuals.
Children under the age of 8 think in pictures. They don't have the same type of mature inner speech that older children and adults do. This doesn't just apply to children on the Autism Spectrum or with communication delays. All children under the age of 8 (and many adults I might add) benefit from the use of images. If you've put any furniture together lately you will know what I'm talking about.
I'm going to share a couple of Brain Smart strategies you can use to add the necessary visual component to successful transitions.
The first strategy includes an intentional pause in the transition to create an optimal learning state. This is called the Brain Smart Start.
Steps to implement a Brain Smart Start transition after play time:
1. Provide a visual signal such as turning off the lights or raising your hand.
2. Provide auditory signal to get everyone's attention such as a chime or rain stick.
3. Have everyone stop and put their hands on their head. This way you know you have their attention.
4. Lead everyone in a deep breathing strategy such as S.T.A.R. (Smile, take a deep breath, and relax).
5. Now that you have their attention and they are calm, you can help them make commitments for what they will do next. If they have more time to play you could remind them that they have 5 more minutes to play so they can finish what they are doing. If it is time to clean up you could say, "Jenny, you start by cleaning up the blocks."
6. Make sure the children know what to do when they are done cleaning up. In my classroom, they knew they could help someone else or they could go on over to circle where there were books to look at, calming creams, and quiet activities they could do until everyone was done.
Once you figure out your routine for cleaning up, you want to make sure you practice it with the children and encourage them when you see that they are doing it successfully. If they are having difficulty then you need to take a look at what skills are missing and make sure you are teaching those skills!
This quick video gives you a glimpse of the Brain Smart Start transition that we used in my preschool classroom with children who have special needs. This was SO much better than when we began. Before we taught the children this Brain Smart transition strategy, there were children screaming, running to the safe place, and throwing toys. By intentionally shifting everyone with this strategy it made a huge difference and everyone was much more successful. As you can see, it's not perfect, but my goal isn't perfection. My goal is to help the children develop the ability to control the impulse to keep playing or throw toys when the world doesn't go their way. My goal is to help them focus their attention and follow directions. I don't want to use behavior charts to make them do that. I want them to have the internal resources to choose to do it (with my help) so they can be more successful throughout life.
The next strategy to help you smooth out your transitions is one of my all time FAVORITE tools! This handy and oh so helpful tool is called the Time Timer. (affiliate link) It is basically a visual timer. It helps children have a visual tool to show them how much time is left. Young children really have no concept of what you mean when you say five more minutes, but if you show them it is much more helpful!

This beauty is the 12 inch timer. (affiliate link) It hangs nicely on a command hook on the wall. It also as an audible signal that you can use to signal that the time is all done.
I used it at various times throughout the day to help with transitions. It was an integral part of the cleaning-up routine as it gave the children an indication of how much more time they had to play before we were going to turn off the lights and begin the Brain Smart Start transition mentioned above.
I had it hanging on the wall just above the reach of children, but low enough that they could see it from almost anywhere in the classroom. I also hung our visual schedule just below the timer so we could use it as an added tool to help with transitions.
You can use pictures from Boardmaker, Google Images, photographs, and student drawings to help you gather images that are meaningful and appropriate for your children. Old school resource catalogs are also a great resource for images that are useful in the classroom.
Whether you are working with your own children in the home or children in the classroom, you want to make sure the visuals are clear and well organized. They also need to be at eye level for the children.
Visuals can be posted on the wall or made into books much like the ones I shared in my previous post about transition tips.
You can also use your body, another child, or objects and materials from around the classroom as visuals too! I had a TON of extra bulletin board borders in my classroom. I laminated them and put the hard side of the Velcro on the back and they made a perfect visual for the children to stand on while they prepared to leave the classroom.

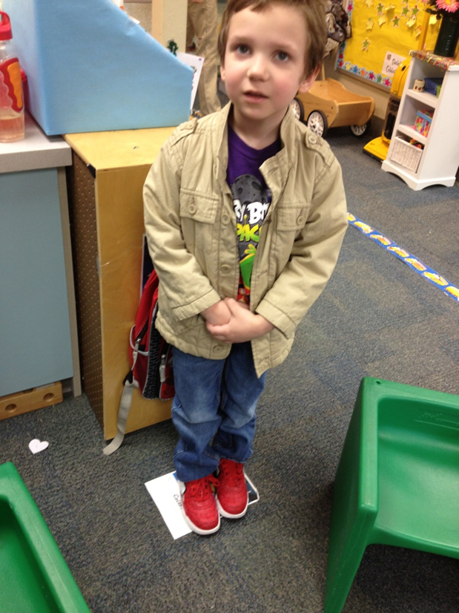
I had a little boy in my classroom who had a really hard time with the transition to leave the classroom. He was overwhelmed by the number of children at the coat closet and with too many people standing by him in line.
He LOVED Angry Birds! So, we used some visuals to help him have a "landing pad" whenever we needed to line up to leave the room. His space was away from the other children and it helped everyone feel more safe when they were lining up. As you can see from the smile on his face he felt happy when he could line up successfully! For him, success looked a little different than it did for the other children.


Here are a couple of my favorite websites for ideas and printables for various visuals for the classroom or home:
If you've done all this and you still have children that are resistant to transitions then it could be a relationship issue. That will be our topic for next week! Stay tuned to learn what to do when you've MAP-ed it out and really reinforced the routines and expectations with lots of practice and visuals, but it's still not working!
